Within the broad GRC console, under the top line risk assessments menu click the sub
menu of assessment campaigns.
With the list of active campaigns, go to the upper right button and click add campaign.
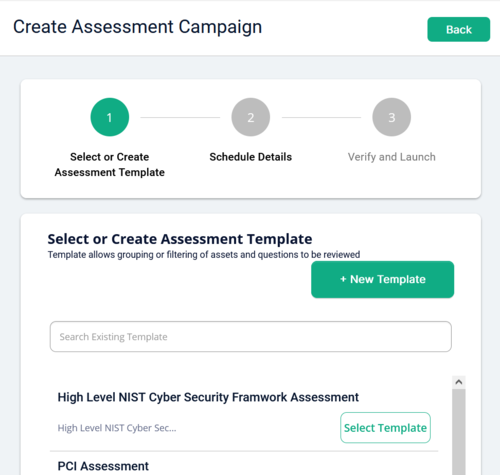
Step 1: Select or Create Assessment Template
Activating a campaign is a simple three-step process. The first step is to create an assessment template by clicking the new template button or selecting one that was previously created.
Enter the template name and the corresponding description. The purpose of the
assessment template is to filter the questions that are associated with the inventory down to the specific list that is appropriate for the audience in which the questionnaire will be sent.
Selecting the inventory type will bring the assessment into focus. There are five
categories from which to select. An asset is a virtual or physical system which has a
distinct role within the environment. The process may focus on the information that
traverses multiple systems. A vendor is an organization in which is external to the
environment. An entity is flexible in order to combine all inventory or focus on a specific
boundary, such as, a data center. The fifth category is the list of automated connectors that form a list of controls that will be used test against a SaaS or other cloud solution.
When selecting the inventory the drop-down menu allows the combination of multiple
items or a single item. The next step is to further customize the questionnaire if needed.
The option to include all questions is available or the select questionnaire button
presents the full list of questions and the ability to individually select questions or search for a group of questions. An example would be to only select the questions that are appropriate for Access control. The search criteria can narrow the question list to targeted questions for the recipient.
Click Save to continue the risk assessment steps
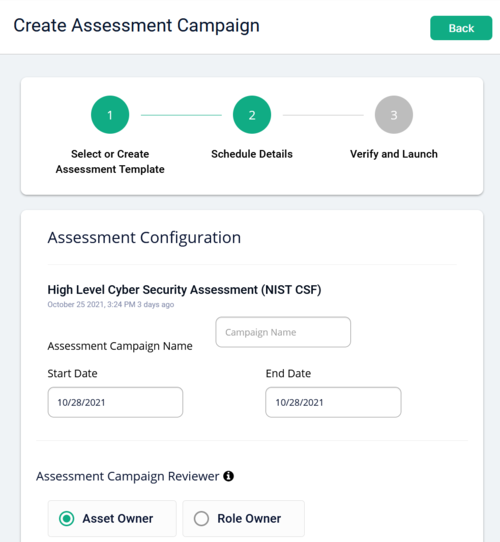
Step 2: Schedule Details
With the list of assets we can now create an assessment campaign name. This is the
text that will be presented to the individual answering the questions in the questionnaire
is a part of this campaign. Provide the name that will be descriptive for the audience.
Select the start date and the end date.
The assessment campaign reviewer is the person or individuals which will answer the
questions sent to them as a part of this campaign. By default the questions are sent to
the asset owner which is assigned during the creation of each asset. The next option is
to assign the questions to a role owner or multiple roles which are configured to match
their job description. An alternate reviewer can be selected if the previous options are
not available or not preferred as the recipients of the questionnaire. If enabled, there is a workflow option of final review her in which after the initial reviewers complete the
questionnaire the final reviewer has the ability to update or modify each question that
was previously reviewed.
The campaign reminders inform the reviewer for number of consecutive days that the questionnaire is available for completion.
The campaign instructions have a default statement at the top of each questionnaire
informing them to answer the questions. This can be customized, by selecting the drop-
down menu item, with content is appropriate for the recipients of the questionnaire.
Click Next to continue this step
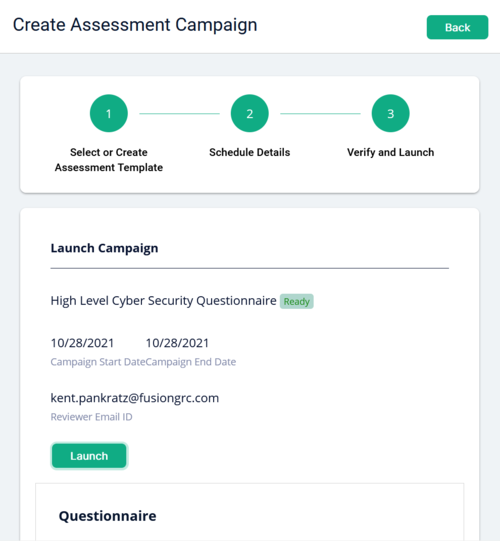
Step 3: Verify and Launch
This page displays the title, dates, reviewer information, and questions within the
questionnaire. At this point review each one for accuracy if needed. The options on this
page are to launch the campaign which puts it in in open status or click the back button
which leaves it in a ready status.
When the launch button is clicked we have an option to send the email notification to all
reviewers, or exclude specific reviewers or do not send any emails by not selecting a
radio button and continue by clicking the launch button in the pop-up window.
That completes the three-step assessment campaign creation process. To continue
evaluating the assessment go to that action options on the right of the campaign list. By
clicking those three dots another menu appears in which to view the campaign, the
same as it is presented to the reviewer, or look at the details, added the campaign
name, close, launch or delete the campaign.
Further menu options allow the continued reporting and response for the campaign after
it's closed.
Here to help you secure your cyber assets
In just 30 minutes, we can show you how consumers are leveraging the power of our modern, simple, SaaS product. And you can too.